Rendering: Settings
Many of these settings affect ray sampling and ray depth. For an overview of what this means, see the page on Path Tracing in Cycles 4D.
Note: it is recommended that you turn on '32 Bit/Channel' in the 'Depth' setting in Cinema 4D's main render settings ('Save' tab). This will give the highest qualty output to the picture viewer. However, in the current version of Cycles, the real-time preview render is set to 16-bit output. This means that 32-bit colour output when rendered to the picture viewer may look slightly different to the render from the real-time preview. You can set the 'Depth' to 16 bits per channel so the picture viewer and real-time preview match, but then the final render may not be as high a quality as it could be.
This is the main panel of settings for Cycles 4D. It is divided into a number of sections, which are as follows:

- Device & Features
- Render Nodes
- Performance
- Integrator & Sampling
- Subdivision
- Light Paths and Ray Depth
- Motion Blur
- Film
- Curve Rendering
- Denoising
Device & Features

Device
From here you can select which processor(s) Cycles 4D will use for rendering. You can choose between the CPU or a GPU from the drop-down menu.
In some cases a device may be present in the menu but when you come to use it, it doesn't actually work. This is not very likely with CUDA unless it is a very old GPU but it happens more frequently with OpenCL. If this happens Cycles 4D will fall back to the CPU so that at least something is rendered.
Multiple graphics cards
If you select CUDA a small arrow appears next to the word 'Device'. Clicking this will open a small subsection like this:

If you have more than one card in your machine, this will contain all the available cards. You can choose which one(s) to use for rendering. If you deselect both Cycles 4D will default to the CPU instead.
A third option may also be present in the 'Device' menu. Cycles 4D now has support for nVidia RTX and OptiX ray-tracing. You will need an nVidia card plus an up-to-date driver to see this option, otherwise it will not be present. The device section will then look like this:

This works in the same way as when CUDA is the selected device.
Note: when rendering with OptiX for the first time there may be a short delay while the kernels are loaded and compiled.
Features
The Cycles engine has a main set of features which are always available, and additional features which are not yet complete or stable enough to be fully supported. If you want to try those features, you can select 'Experimental' from the drop-down menu, otherwise leave it at 'Supported'.
Open Shading Language
If you want to use shaders written in the Open Shading Language, you need to turn on this switch.
Note that OSL is not supported on any GPU processor, so if you want to use OSL, you must select the CPU option from the Device menu.
Render Nodes
This menu allows you to select the render device used on any render nodes.
Note that that this menu only applies to render nodes.

Device
This is the device the nodes will use. The options are:
Default
No change to the 'Device' specified in the Device and Features section.
CPU
Changes the device to CPU.
CUDA (GPU)
Changes the device to CUDA and uses all available GPUs.
CUDA (GPU + CPU)
Changes the device to CUDA and uses all available GPUs and the CPU (not supported for the real-time preview renderer).
OpenCL (GPU + CPU)
Changes the device to OpenCL and uses all available GPUs and the CPU (not supported for the real-time preview renderer).
OptiX (GPU)
The device will use the nVidia OptiX raytracer, if available on that device.
Note that in all cases if you select an option which is not available or not supported on the node, the node will fall back to the CPU. It is up to you to choose an option that will actually work on your render nodes.
Performance
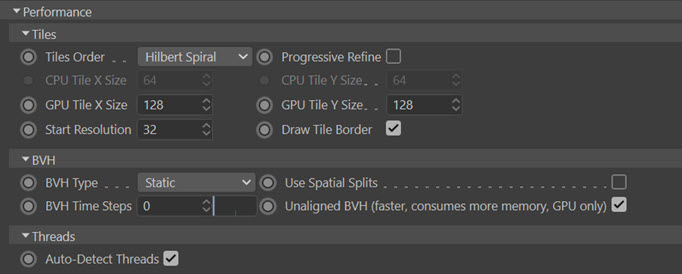
Tiles Order
Cycles always renders in tiles (or buckets). You can choose to see the result as each tile is rendered by turning off 'Progressive Refine' (see below). If you do, the order in which the tiles are rendered can be selected from this drop-down menu. Changing this does not speed up or slow down the rendering, it is for user convenience only.
Progressive Refine
As mentioned above, the Cycles engine always renders in tiles. Turning this switch on will cause the whole image to be shown at once then successively refined until complete. If enabled, this will slow down the render, sometimes quite significantly. It can be useful to see the whole image at once while developing the scene, since you can see the overall effect without having to wait for a complete render. For this reason, the real-time preview window is not affected by this switch; it always uses progressive refine. But for the final render, turn this off to speed up the rendering.
CPU Tile X Size, CPU Tile Y Size
The pixel size of each tile when rendering on the CPU. For CPU rendering small tiles are better; a value of 64 for X and Y is suggested. Larger values may slow down the render.
GPU Tile X Size, GPU Tile Y Size
The same as the CPU tile sizes but these are used when rendering with a GPU. Small tile sizes are inefficient when using the GPU and it they are too small, GPU rendering can actually be slower than the CPU. For GPU rendering, 128 is recommended.
In all cases you can also set the tile size to be a proportion of the render size. For example, if the render size is 800 x 600, you could set the tile size to 400 and 300, or 400 x 150, or any combination of multiples of the render size. Just type the size and the divisor into each field, e.g. '600/4' (=150). With GPU rendering this can sometimes give a faster render.
Start Resolution
This is the initial resolution the real-time preview render is started at. Lower values will show the rendered image more quickly but initially at a lower resolution; higher values take longer but the first appearance will be of higher quality.
This has no effect on the quality of the final output. Lower values may take slightly longer to render the preview.
Draw Tile Border
If checked, Cycles 4D will show the boundaries of the tile while it is being rendered. This has no effect on the final render.
BVH Type
BVH stands for Bounding Volume Hierarchy. It is a method of dividing up space in the scene creating a tree-like data structure, the aim being to increase render speed. This drop-down menu gives you two options:
Static
This is the default setting. Whenever the scene changes the BVH tree is rebuilt, with the result that the real-time preview window is slower to update, but will complete its render faster. You should select this option if you are editing materials since if 'Dynamic' is selected a change in materials will not force an update of the preview window.
Dynamic
With this option only part of the BVH tree is rebuilt if the scene changes, so the real-time preview is faster to update - useful if you are moving objects or the camera around - but slower to complete the render.
Use Spatial Splits
This strange-sounding option is only useful if you have a mesh with complex geometry where large polygons abut small ones. With this option enabled it takes longer to build the BVH tree (see above) but is faster to render. See this nVidia paper for technical details if you are interested.
BVH Time Steps
This is an optimisation setting which will speed up render times in scenes using motion blur. Render time will decrease as the number of time steps increases, at the cost of significant additional memory use.
Unaligned BVH
 If checked, this option will result in faster renders but will use more memory. It will only work if 'Device' is set to a GPU.
Auto-Detect Threads
Only used when rendering on the CPU. If checked, Cycles 4D will use the maximum number of threads available to speed up rendering. This may make it harder to do other things on the computer while it is rendering; if so, turn this off and another control will appear (named 'Threads') in which you can set the number of threads to use. You can then set it to something less than the number of CPU cores to set aside some processing power for other tasks.
Integrator & Sampling

Cycles is an unbiased, ray-tracing render engine and in this engine, the algorithm used to sample the rays in the scene is known as the integrator. In essence, the algorithm samples light rays randomly from the scene to build up the overall picture. As you might expect, more samples result in a higher quality image, but will take longer to complete.
Sampler Pattern
This is the pattern used to sample the scene. The choices are Sobol or the newer Correlated Multi-Jitter. Sobol may be a little faster but Correlated Multi-Jitter can produce a higher quality image (less noise).
Light Sampling Threshold
This setting controls optimisation of light sampling. If a scene light adds so little light to the area of the scene being sampled that it is below this threshold, the light will not be included in the sampling. The result is to speed up the rendering by not sampling lights which make little or no difference to the final result. Note that increasing this value may result in increased noise in the render.
Clamp Direct and Clamp Indirect
These settings can be used when reducing 'fireflies' in the render. For more details, see the page 'Reducing Noise: Fireflies'. Note that if set to zero, clamping is disabled.
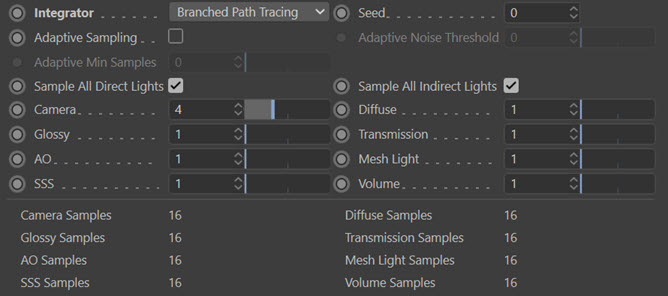
Integrator
The algorithm used by the ray tracer. It can be a simple ray tracer ('Path Tracing') or 'Branched Path Tracing' which splits the ray into different types, such as diffuse, glossy, etc. when it first hits an object. Each sample is slower with this method but fewer are needed (making it faster) or can produce a higher-quality image with the same number of samples.
Because the branched algorithm splits the ray into different ray types, it does give you additional control over the number of samples for each ray type. Selecting this algorithm will add some extra controls between the Samples field and the Volume Sampling section:
Caution: using branched path tracing and rendering on the GPU is not recommended. For various reasons the GPU is not suited to this algorithm and using it may result in display driver crashes. Use the CPU if you use this integrator.
Sample All Direct Lights
If 'Sample All Direct Lights' is checked, when a ray hits an object in the scene all direct lights are sampled to see if the point is illuminated by that light. This provides the best quality image, but can take longer to render; unchecking it will cause a randomly-selected single light to be sampled, which is faster but can cause much more noise.
Sample All Indirect Lights
'Sample All Indirect Lights' will do the same as Sample All Direct Lights but for indirect light sources - that is, light which has bounced off other objects.
The remaining settings allow you to set the number of samples for each ray type. Rather than changing the number of samples for all rays in the main Samples setting (see below), you can alter the samples for different rays; so for example, if in your scene the diffuse areas looked fine but glossy areas were noisy, you could increase the number of samples specifically for glossy rays. This is more efficient than increasing the number of samples for everything.
How many samples do you actually get? The actual numbers are shown in the list below the settings - in this screenshot they are all 16. This figure is arrived at by multiplying the Camera samples (4 by default) by the samples for each ray type (all are 1 by default) then squaring the result. So for example, Camera x Diffuse equals 4 x 1, which is squared to give 16.
You can see from this that if you increase the Camera rays setting to 6, the samples for ALL the ray types will increase (to 36). But if you increase the Diffuse setting to 2, the Diffuse sample will be 64 (2 x 4 = 8, squared = 64) but the others will all remain at 16.
Seed
This is the seed value for the sampling pattern. In general you can leave this set at the default of zero. This will automatically animate the seed value and produce animated noise if you render an animated scene (which is usually what you want). Note that in this context 'noise' does not refer to a noise texture but the noise or grain which can appear in the rendered image.
See the following movies for the difference. In the first, the seed has been left at zero and the film noise changes in each frame, making it look surprisingly like a grainy old movie:
In this one the seed has been set to 1, so film noise does not change in each frame. This makes it look as if you're watching through a dusty window:
Adaptive Sampling
If checked, the number of samples will be reduced in areas where there isn't a great deal of noise. This gives faster rendering and also allows you to specify an acceptable level of noise in the 'Adaptive Noise Threshold' setting.
Adaptive Noise Threshold
Only available if 'Adaptive Sampling' is checked. This setting specifies an acceptable level of noise; if the noise in an area is below this value Cycles will stop sampling. If set to zero, Cycles 4D will automatically set an appropriate level.
Adaptive Min Samples
Only available if 'Adaptive Sampling' is checked. It specifies the minimum number of samples taken before using adaptive sampling to decide whether to stop sampling. If set to zero, Cycles 4D will automatically set an appropriate minimum number.
Samples
The number of samples to take when rendering (automatically squared, so a setting of 4 means 16 samples). Note that you can set a value for the final render in the main render settings, and a different value in the real-time preview.
AO Bounces
This is a methof of reducing render times by replacing true global illumination with an approximation of ambient occlusion after the number of light bounces specified in the control. It is most likely to show differences in complex scenes rather than simple ones.
The default setting of zero means that full GI is rendered without replacement by an approximation of AO. Setting the value to 1 will in some cases cause a very significant speed up of rendering at the cost of less accurate and more noisy renders. You can then look for the required balance between speed and quality by increasing this value, which will give higher quality renders but take more time.
Texture Limit
This drop-down menu controls the amount of memory used by scenes with large textures. If a texture is larger than the size shown in the menu it will be scaled down until it falls below the limit. This is useful when developing the scene. The default setting is 'No Limit', when no scaling takes place.
Volume Sampling - Step Size and Max Steps
These settings are used when using volume shaders. The ray tracer only samples the volume in steps rather than trying to sample every point in the volume (which is potentially an infinite number). The step size is the distance between sampled points in Cycles' internal units. Reducing this value will increase the number of samples giving a higher-quality result, but will also take longer.
The number of steps varies but to reduce render times is set to the maximum number in the 'Max Steps' setting. Increasing this value will increase the number of samples giving a higher-quality result, but will also take longer.
Subdivision

These settings are used for adaptive subdivision and micropolygon displacement. For details on how to use them, see the How To: Use Displacement page.
Subdivision Rate (Pixels)
The amount of subdivision expressed in pixels; by default it is set to 5, which means that 1 pixel represents 5 polygons. This can be set to a different level in the real-time preview window. Note that the smaller this value, the more detailed the result but that memory use and render time are increased as a result.
Max Subdivisions
To prevent excessive subdivision from using large amounts of memory, and increasing render time, this value sets the maximum number of subdivisions which can take place.
Light Paths and Ray Depth
To understand these settings, a basic understanding of how path tracing works is required. See this page for an overview of how a raytracing render engine works.
There is also an excellent tutorial on these settings in Cycles 4D from Silverwing Training at https://vimeo.com/193191849
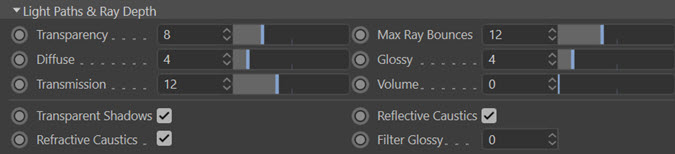
Transparency
This is the minimum number of times a ray can interact with a transparent surface before it is terminated. If you have a scene with a lot of transparent objects, where rays must pass through several of them, you may see black artefacts where a ray has come to an end. In that case, increase this value.
Max Ray Bounces
This is the limit on the number of bounces a ray can make. For example, if you set Max Ray Bounces to 1, you will get only one bounce - even if 'Diffuse' is set to 4 or more (see the example below).
Diffuse
The depth (i.e. number of bounces) for diffuse (surface) rays. Altering this will change the amount of indirect lighting in the scene, since this comes from light bouncing off scene objects. See this example:
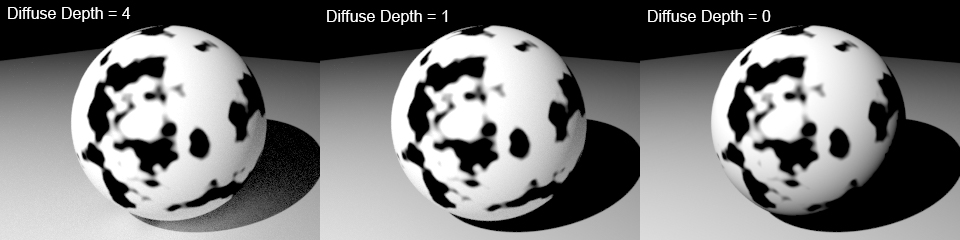
You can see in this example that with a value of 4, there is reflected light in the shadow under the sphere. With a value of 1, this is lost, but the underside of the sphere itself is still partly lit by light reflected from the floor. With a value of 0, even this is lost and the underside of the sphere is completely dark.
You can increase the number of diffuse bounces, which may slightly improve indirect lighting, but will be slower to render. As always, it is a trade-off between render time and render quality.
Glossy, Transmission, and Volume
The same as for 'Diffuse', except for glossy, transmission and volume scattering rays respectively.
Transparent Shadows
If checked, this switch will cause shadows produced from partially-transparent objects to be transparent, which is physically correct. If it is unchecked, shadows will be opaque even if the object was transparent.
Reflective Caustics and Refractive Caustics
These switches let you enable or disable caustics caused by light reflection and refraction. Normally you would leave them enabled but turning them off can be useful in reducing fireflies.
Filter Glossy
This setting, if it is higher than zero, will apply a filter to blurred glossy reflections (i.e. those where the Roughness setting in a shader generating glossy reflections is greater than zero) in order to reduce noise. It can also be helpful in reducing fireflies.
Motion Blur

For details on adding motion blur to a scene, see the 'How-To: Add Motion Blur' page.
Note: if you want to apply motion blur to an ExplosiaFX simulation the scene MUST be cached first. Motion blur for these simulations cannot work on uncached scenes. This is also true for any scene which relies on the state of previous frames to the one being rendered. That might include fluid simulations, scripts, etc.
Motion Blur
Turn on this switch to enable motion blur. Motion blur can be enabled or disabled on a per-object basis in the cyObject tag.
Brute Force
By default Cycles 4D uses a 'smart' motion blur algorithm. If this fails to work correctly in a scene, you can return to the legacy 'brute force' mode by checking this switch.
Affect All Objects
This switch determines whether motion blur is applied to all objects in the scene. It is overridden by the motion blur settings in the cyObject tag.
If checked, all objects will be rendered with motion blur unless the object has a cyObject tag with its Motion Blur switch unchecked.
If unchecked, no objects will be rendered with motion blur unless the object has a cyObject tag with its Motion Blur switch checked.
Motion Steps
Increasing this value will render the motion blur more accurately but will use more memory. The default value is 1.
Film

These settings affect the rendered image as a whole.
Exposure
A simple exposure setting that increases or decreases the overall brightness of the render. A value of 1 means no change.
Type
This, together with the Filter Width setting, is the Cycles 4D equivalent of anti-aliasing.
This drop-down menu offers three types of anti-aliasing filter - Box, Gaussian, and Blackman Harris (the default). Blackman Harris is the 'best' filter in most cases while Box is the simplest and least effective.
Filter Width
This setting controls how much anti-aliasing will be applied. Increasing this value will result in a softer render; lowering it will sharpen the render at the risk of introducing visible aliasing.
Transparent Background
If this switch is checked any visible background (from a cyEnvironment object) will be rendered transparent. Effectively this gives you an alpha map of the full image. It is also useful if you want to light a scene with an HDR image but don't want to see that image in the render. You can then composite the rendered image in post work.
Roughness Threshold
Transparent objects with a roughness above this value will be rendered opaque.
Transparent Glass
If this is unchecked and 'Transparent Background' is also checked, the background will be rendered behind glass objects, which is probably not what was intended. To avoid that, keep this switch checked.
Curve Rendering

These settings are all to do with rendering splines without geometry (Blender calls them 'curves'). To render a spline, simply add a cyCurve tag to it and change the settings in the tag and render settings.
Curve Shape
This drop-down menu lets you set the shape of the rendered spline. There are two options:
Thick
Renders a circular profile which, if the thickness settings in the cyCurve tag are large enough, can be seen to be a hollow cylinder.
Ribbons
Renders a flat, ribbon shape.
Curve Subdivision
The curve subdivision setting. Effectively this smooths a curve without changing the overall shape.
Consider a text spline with all its default settings and 'Curve Shape' set to 'Ribbons'. On the left, this setting is set to zero (the default) and on the right to 8:


How do you render the spline with straight lines? To do that, you need to adjust the cyCurve tag settings. See the curve tag page for more details.
Denoising
If denoising is enabled, the denoiser runs after each bucket is rendered. The denoiser can significantly reduce render time by allowing you to reduce the number of samples, for example.
The denoiser works very well for stills but can produce flickering when used on an animation. To minimise this, set the 'Seed' value in the Integrator settings to a fixed value, e.g. 1.
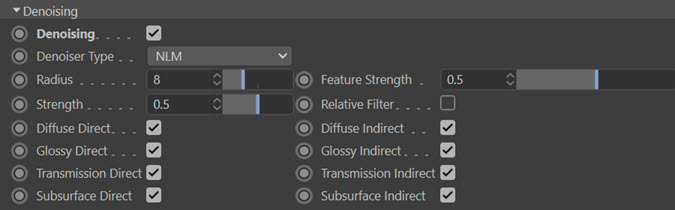
Denoising
Check this switch to enable denoising.
Denoiser Type
There are three options in this menu:
NLM
This is the original denoiser in Cycles 4D (NLM stands for 'Non-local means'). This is the default option. If selected, a number of other settings become available.
Optix
The OptixAI denoiser is selected. This will only work if the 'Device' menu is set to 'Optix' and therefore requires an Optix-compatible graphics card. It gives a faster result than NLM but is best used on still images, not animations.
OpenImageDenoiser
This is an alternative denoiser based on the open-source Open Image Denoise from Intel.
Input Passes
Only available for the Optix and OpenImage denoisers. It is the number of passes used for denoising. The default is 'Color' but 'Color + Albedo' may give a better result.
The following options are only available if 'Denoiser Type' is set to 'NLM':
Radius
This is the size of the area of the image used to denoise a specific pixel. If you increase the value, the denoising will take longer but will give smoother results. However, that in turn may cause a loss of detail.
Feature Strength
This setting affects the removal of noisy features. If you increase the value, the denoising will give smoother results but may cause a loss of detail.
Strength
This setting controls the weighting of neighbouring pixels to the one being denoised. If you increase the value, the denoising will give smoother results but may cause a loss of detail.
Relative Filter
Checking this switch may help to reduce artefacts resulting from the denoising but can cause a loss of detail around edges.
Diffuse Direct, Diffuse Indirect
Glossy Direct, Glossy Indirect
Transmission Direct, Transmission Indirect
Subsurface Direct, Subsurface Indirect
All these switches do the same thing: when checked, they denoise the type of lighting given in each switch. For example, if you have a scene which only has diffuse lighting with no glossy, transmission, or subsurface components, you would only need to check the two diffuse lighting switches to denoise the scene.
You can check or uncheck these switches to use the denoiser on specfic types of light ray, so if you want the diffuse indirect light to be denoised but not the diffuse direct light, you can uncheck 'Diffuse Direct'.