Path Tracing
Cycles is a path-tracing unbiased render engine. Although you don't have to know anything about path tracing to use Cycles 4D, if you want to understand fully the various render settings, especially those concerned with sampling and ray bounces, it is helpful to know a little about how a path tracer works. That is the purpose of this very brief overview.
You might also want to view Disney's Practical Guide to Path Tracing, which is a very clear and simple introduction to the basic principles:
So how does it work in the Cycles render engine?
Sampling
From lights or from the camera?
Consider what happens to a ray of light from a light source in the scene. After leaving the light it will (or more correctly, may) hit a scene object and interact with it in some way. It may bounce off the surface, pass through it unchanged, be refracted, or partially absorbed and so on, until eventually it arrives at the camera. (Note that the interaction of a ray with an object is called a 'bounce' even if the ray does not, in fact, bounce.) The renderer then collects ('integrates') all the rays arriving at the same point on the camera's view plane to produce the final rendered pixel.
That way would be extremely slow, for the simple reason that most rays would never arrive at the camera at all. The renderer would have to follow millions of rays but only a few would count towards the rendered image.
For this reason, modern path tracers do it backwards. A ray is fired from a point on the camera's view plane into the scene. It then interacts with the scene as described above until it arrives at a light source (either an actual light or light which comes from light bouncing off a surface), at which point it is terminated. By only tracing what happens to rays which, by definition, must arrive at the camera, this method is much faster and more efficient.
How many rays?
One ray per pixel is clearly nowhere near enough. Since rays could be fired from the initial point in any direction, a ray which moves in one direction might produce very different results to one fired in another direction. The rendered image is therefore the result of integrating a very large number of rays.
It's clear from this that the more rays you sample, the higher the image quality, but the more time it takes. The number of rays is controlled in the render settings by the 'Samples' parameter. The higher this number, the more rays are sampled; as you increase this number you will get a better image with less 'noise' (a grainy appearance in the image), but it will take longer to render.
The integrator
The algorithm used to calculate the lighting at any point is known as an integrator, because it integrates all the rays which intersect an object at any point into one final result. This is why the render settings have an 'Integrator' section.
What is described above could be called a simple path tracer (or a progressive integrator) and is the default integrator in the render engine. Cycles has a second integrator known as branched path tracing (or a non-progressive integrator). This differs from the pure tracer in two important ways.
Different types of rays
When a ray hits a surface, it can be bounced in a random direction (a diffuse ray), or be reflected (glossy ray), be affected by refraction or sub-surface scattering (transmission ray), and so on. The simple path tracer just treats the ray as a single ray but the branched path tracer splits the ray into these different types and considers them separately. The advantage is that the image is less noisy, but will (of course) take longer to render. However, since this algorithm gives you control over the number of samples per type of ray, you can set very low samples for those rays you don't need and higher ones for those you do, so reducing the render time.
In the render settings you can see the controls over sampling the different ray types if you select the branched path integrator..
Scene lights
The simple path tracer only takes one randomly-selected light source into account. This is fine for simple lighting but if the lighting rig is more complex better results would be obtained if all light sources, direct and indirect, were considered. This is what the branched path tracer does. As you would expect, this does take longer than using one light but results in higher image quality.
Ray Depth
So far, we have only considered the number of samples. But there is another important factor: how often should the ray bounce (this is referred to as the 'ray depth')?
In reality, any light ray will bounce for ever, but will get less and less intense as it does. Eventually, it will be so weak it cannot be seen by the camera, and at that point there is little to be gained by still tracing it. Therefore the render engine allows to you specify how many bounces a ray can make before it is terminated. Reducing the number of bounces will speed up the render but may result in errors of lighting and reduced image quality (more noise).
As an example, look at the Diffuse Depth in the render settings (in the Light Paths section). By default, this is 4. What happens if we reduce this value?
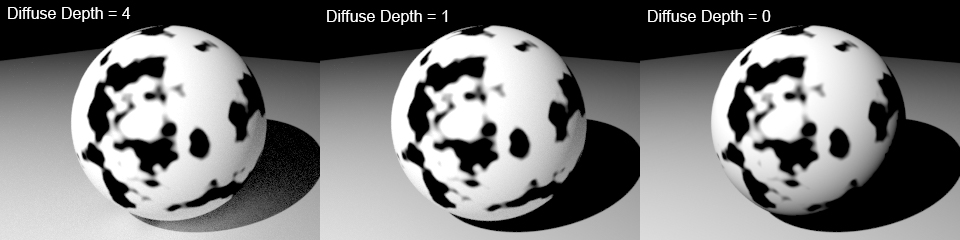
On the left is the default setting of 4 bounces. You can see that the underside of the sphere, away from the main light source, is still lit. That is due to light bouncing off the floor object it rests on and onto the sphere. Light then bounces back off the sphere and onto the floor where it brightens part of the shadow.
When the depth is set to 1 (middle image) note how the indirect lighting under the sphere has disappeared, and the shadow is now completely dark. When set to 0, all indirect lighting is gone and all you see is direct lighting, so the part of the sphere away from the light source is black.
You can see from this that changing the number of bounces may have a significant effect on the scene lighting. Note that increasing it may not always have much effect. In the above scene there was little difference between a diffuse depth of 4 and one of 20, just a very small increase in indirect lighting.
In addition to diffuse depth, you can change glossy, transmission, and volume ray depth as well.
Transparency
Transparency is treated slightly differently because it has both a maximum and minimum setting for the ray depth. Each time a ray passes through a transparent object, the number of interactions with a surface is incremented. When the maximum number of interactions is reached, the ray will be terminated. At that point it will return nothing - that is, the area will be black.
Take a look at the animation below. This has 8 concentric circles with decreasing radii, the smallest being in the centre. Each sphere has the same transparent material applied, tinted red so it can be seen. The maximum transparency depth is initially set to 2, increasing by 2 every 10 frames. Note that at first only the outer sphere can be seen as a thin rim of red, the rest of the spheres being black, because the rays don't get to them before they are terminated. As the transparency depth increases the inner spheres become visible, until when the maximum depth is 32, they are all visible:
This setting is useful to remember if you have a lot of transparent objects in a scene and you start seeing black artefacts on rendering. If that happens you may need to increase the transparency depth.
The minimum depth is just that, the minimum number of interactions that will occur, up to the maximum (setting the minimum higher than the maximum simply clamps the minimum at the maximum setting). If the minimum is less than the maximum some rays will be randomly terminated at some point between the two values, which may lead to black artefacts. As a rule then, these two levels should be kept the same, unless you really know what you're doing and can get away with reducing the minimum to speed up the render.
Volume Sampling
When a ray is affected by the volume of an object, there are two other possibilities: the rays may be scattered and/or they may be absorbed. (Volume shading in Cycles 4D is done by using the Volume Absorption and Volume Scattering material nodes.)
The settings Step Size and Max Steps are used when using volume shaders. The ray tracer only samples the volume in steps rather than trying to sample every point in the volume (which is potentially an infinite number). The step size is the distance between sampled points in Cycles' internal units. Reducing this value will increase the number of samples giving a higher-quality result, but will also take longer. The effect can be subtle but noticeable. See this example where a sphere has a volume scattering node added and the step size ranges from 200 on the left to 5 on the right:
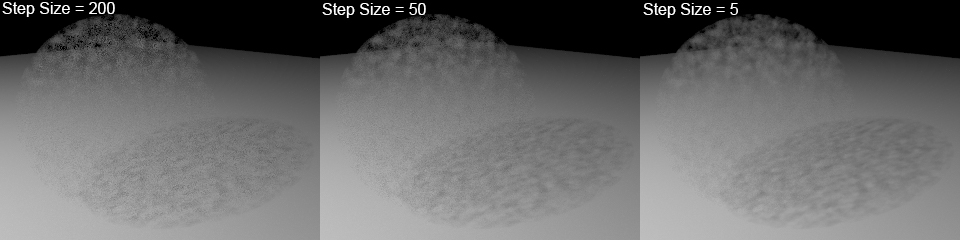
If you look carefully you can see that with a step size of 200 the volume rendered area is quite noisy. Reducing this to 50 improves it but noise is still visible. A value of 5 gives a much smoother image. Reducing that still further has little noticeable effect in this scene.
The number of steps varies but to reduce render times is set to the maximum number in the 'Max Steps' setting. Increasing this value will increase the number of samples giving a higher-quality result, but will also take longer to render.
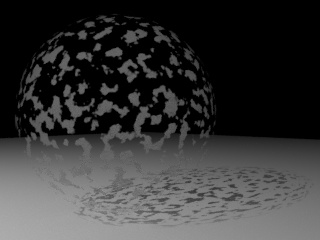
Note that these settings are only used if the volume is heterogeneous. In the above example the volume density was controlled by a Noise texture, so the density varies at different points in the volume - it is then said to be heterogeneous. It is possible to force the material to be considered as homogeneous (by checking the 'Homogeneous Volume' switch in the material settings), in which case the step size and maximum number of steps are no longer used. However, the render will look very different! Here is the same scene but set to be a homogeneous volume:
Whether or not this is of use will depend on the effect you are trying to achieve.