Cycles 4D Volume Object
 The cyVolume object is a quick and easy way to add volumes to your scene. It could be used, for example, to add volumetric lighting to the scene or anywhere where you need a volume of some kind.
Please see the section 'Using the cyVolume Object' before using this object for the first time.
Interface
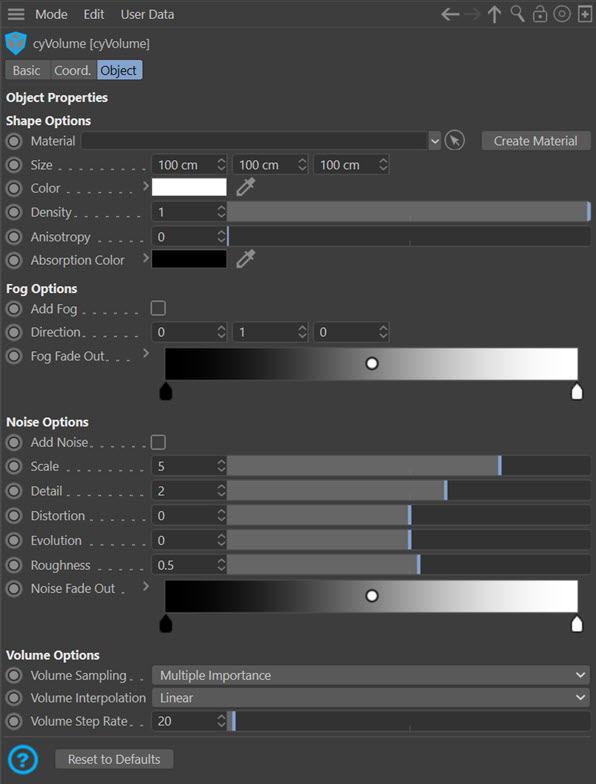
Parameters
Shape Options
Material
The various parameters can all be controlled by the object's interface, but if you need finer control you can create a volume material and add it to the object by dragging it into this link field. It must, of course, be a volume material - a surface material will not work.
If you click the 'Create Material' button a volume material will be created for you and added to this field.
Create Material
Click this button to create a volume material and add it to the 'Material' link field.
When you do this, a complex material is created with a large node tree. You can then control every aspect of the object by editing the material, which gives you complete control over all the parameters. In many cases, however, the object's parameters will give you all the control you need.
If you have done this, note that any changes made in the material will be reproduced in the object parameters, and if you change the parameters the material node settings will be updated accordingly.
Size
Use this parameter to change the size of the object. You can also use the drag handles on the object in the viewport to resize it.
Color
This is the volume colour.
Density
The volume density. A value of zero shows no volume effect. Values higher than one are possible and give rise to an increasingly solid appearance.
Anisotropy
Skews the angle of the scattered light and alters the appearance.
Absorption Color
The colour of the volume shadow.
Note that this will have no effect if the 'Color' is pure white. As 'Color' becomes darker, the absorption colour is more apparent, and if 'Color' is black, only the shadow colour is visible.
Fog Options
Adding fog creates a mask over the volume.
Add Fog
Check this switch to add fog.
Direction
The 'Fog Fade Out' gradient can work across any of the three axes. By default this is set to 0, 1, 0 which means that the fading out works from the top of the volume downwards. If you set it to 0, -1, 0 it will work from the bottom up. You can change this setting so that fading occurs in any direction and angle.
Fog Fade Out
This is the gradient used to create the mask. Where the gradient is black the volume is completely masked, where it is white it is not masked at all.
Noise Options
These are very useful options which enable the adding of noise to the volume.
Add Noise
Check this switch to add noise.
Scale, Detail, Distortion, Evolution, Roughness
These are exactly the same as the parameters of the Noise Texture node. Please refer to the page for that node for details.
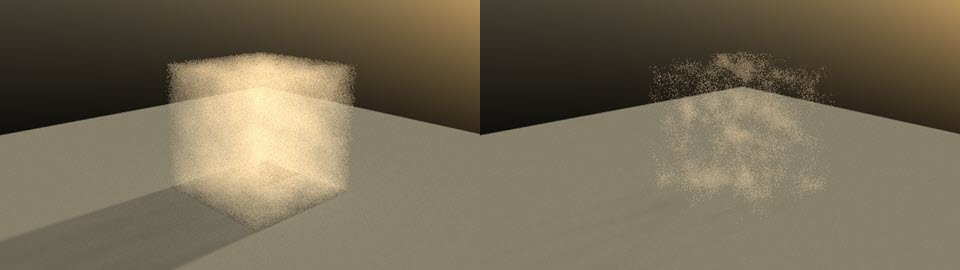
Noise Fade Out
This gradient determines how quickly the density fades from the noisy areas. For example, in these two images the default gradient is used in the left-hand image, while in the right-hand image the black knot in the gradient has been moved to 50% along the gradient:
Volume Options
Volume Sampling, Volume Interpolation, Volume Step Rate
These are the standard material settings for all volume materials. Please refer to the Cycles 4D Materials page for details.
Using the cyVolume Object
This is very simple. All you need to do is add the cyVolume object to the scene. Then you can resize it and change its position and/or rotation as required.
You will also need a light source of some kind. A scene light, an Environment object or a Sky object will all work. Note that the colour of the light will affect the colour of the volume.
When rendering, by its very nature you may see quite a noisy image, so it may be necessary to increase the number of samples or consider using the denoiser.