Camera Tag
The Cycles render engine does not support all the Cinema 4D camera types you may be used to. The available types are explained in the Blender Cycles manual, which can be found here:docs.blender.org/manual/en/dev/render/cycles/object_settings/cameras.html
In Cycles 4D some of the functions of the camera object are controlled by this tag. Some of the basic camera functions in the camera object itself are still used, but not all. These are the camera controls which you can and should still use:
Object tab:
- Focal Length
- Sensor Size
- Field of View
- Film Offset
- Focus Distance
- Use Target Object
- Focus Object
Composition tab:
- All
None of the other controls in the camera have any effect in Cycles 4D.
Interface
The main Settings tab of the tag interface looks like this:
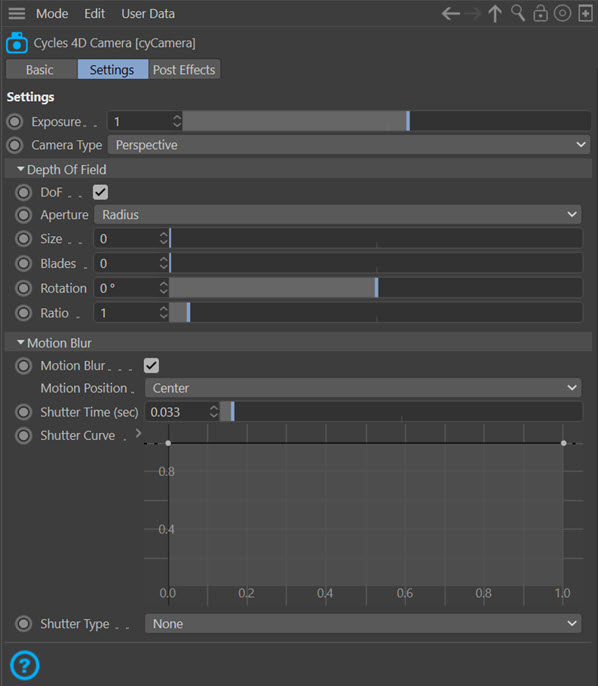
See here for the Post Effects tab.
Exposure
As its name implies, this setting reduces the light exposure in the camera. This can be used to brighten an overly-dark image or reduce brightness in one which is blown out.
Camera Type
The camera type. Choose the camera type you need from this drop-down menu. The orthographic camera is equivalent to Cinema 4D's parallel camera; the other modes have no direct equivalent in Cinema 4D.
Depth of Field
These settings control depth of field (DOF) in Cycles 4D. To implement DOF, all you need to do is set a focus distance in the camera then change the aperture to suit.
Note that the DOF maps in the camera object have no effect, and neither does the depth of field post-effect.
DOF
Check this switch to enable depth of field for this camera.
Aperture
You can choose between two methods to set the aperture in this drop-down menu. These are:
Radius
Sets the aperture size in internal Cycles 4D units. A value of 0.1 - 0.2 is often sufficient but you will need to experiment with these depending on the size of the scene. The smaller the value, the less is the DOF effect; a value of zero results in no DOF.
F-Stop
The aperture size is measured in camera f-stops; the smaller the f-stop the greater the DOF.
Size
The aperture size in either Cycles 4D internal units or f-stops.
Blades
The number of virtual 'blades' for the aperture opening. These are used to produce bokeh effects. For a good bokeh, 6 to 8 blades are needed. You can obtain this sort of result:
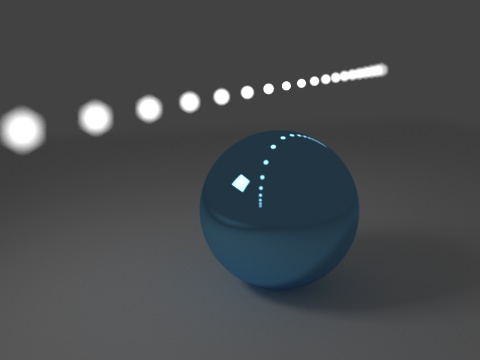
This shows a string of spheres with an emission shader along a line from front to back. The focus distance is the sphere itself and the blade count is 6. Note the hexagonal bokeh especially from the light closest to the camera.
 Note: since Cycles 4D lights are not visible in the camera, you must use a mesh light to get bokeh effects.
Rotation
This setting will rotate the bokeh effect around the axis facing the camera.
Ratio
This distorts the bokeh to either squash it or stretch it. The default value of 1 results in no distortion, raise or lower this value to distort the bokeh.
Motion Blur
These setting control the appearance of motion blur in this camera.
Note: to use motion blur you must also enable it in the render settings.
Motion Blur
Check this switch to enable motion blur in this camera (not scene-wide).
Motion Position
This drop-down menu sets the position for the blurred area. The default is Centre, which means the blurred area is centred about the object. With Start, the object will appear to have a blurred tail, while with End the blurred area is actually in front of the moving object.
Shutter Time (sec)
The length of time the shutter stays open. The longer the time the greater the blur. For many purposes the default setting of 0.1 seconds is satisfactory.
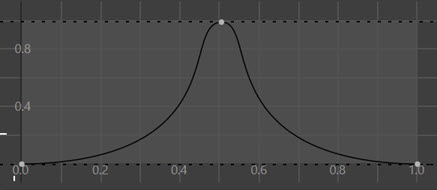
Shutter Curve
With this curve you can control the width of the blurred area. What it does is modify how the virtual shutter opens and closes, effectively allowing you to provide some lead-in and lead-out time for the shutter movement. Compare these two frames from the same scene, the only difference being the shutter curve:
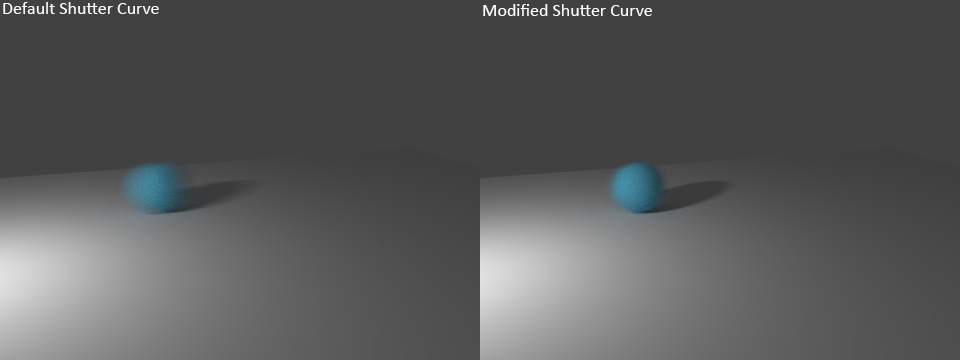
The modified curve looks like this:
This gives a narrower blurred area which might be better suited for your scenes. You can adjust curves as you like, see this web site for some examples.
Shutter Type
This drop-down menu makes the camera emulate the rolling shutter of a typical CMOS camera. If you aren't sure what a rolling shutter is, see this page on red.com: http://www.red.com/learn/red-101/global-rolling-shutter
The menu currently has two options:
None
No rolling shutter effect.
Top-Bottom
The effect is that of a top-to-bottom rolling shutter.
Post Effects
Important: to use these effects, you must add a camera to the scene with a cyCamera tag attached to it AND the camera must be the active scene camera. If you only add a camera but do not make it the active camera, you won't see any post effects.
In addition, you MUST turn on '32 Bit/Channel' in the 'Depth' setting in Cinema 4D's render settings 'Save' tab. If you don't do that, the output in the picture viewer may be different to that in the real-time preview window.
The Camera tag enables and controls post effects in Cycles 4D. The tab interface looks like this:
Bloom settings
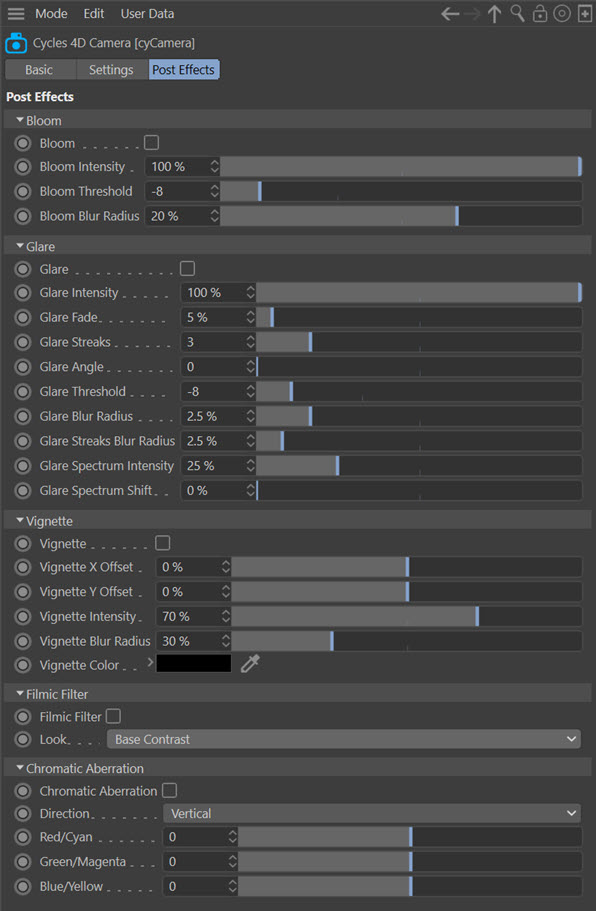
Bloom
Turn on this switch to enable this post effect.
Bloom is the glow around a light or illuminated object, often seen when the light is much brighter than the background:
Bloom Intensity
The intensity - that is, brightness - of the bloom.
Bloom Threshold
This setting affects whether bloom will occur for any given light intensity. Suppose you have a dim light but you'd still like to see some bloom. In that case, reduce this setting so that bloom is more likely to be seen.
On the other hand, you might have a very bright light giving excessive bloom. In that case, increase this value until the bloom amount is as desired.
Bloom Blur Radius
As this value increases the bloom becomes more and more blurred. The effect is to give a larger but softer bloom area.
Glare settings
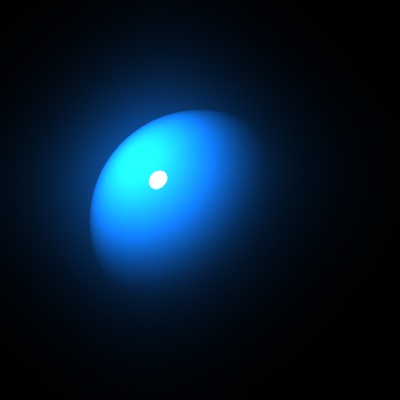
Glare
Turn on this switch to enable this post effect.
Glare is due to scattering of light in the lens of a camera, producing bright streaks or flares:
Glare Intensity
The brightness of the glare effect.
Glare Fade
As this value increases the glare effect fades away from its starting point.
Glare Streaks
The number of glare streaks. In the above image, this is set to 3.
Glare Angle
By changing this parameter you can rotate the glare streaks around the source point.
Glare Threshold
This setting affects whether glare will occur for any given light intensity. Suppose you have a dim light but you'd still like to see some glare. In that case, reduce this setting so that glare is more likely to be seen.
On the other hand, you might have a very bright light giving excessive glare. In that case, increase this value until the glare amount is as desired.
Glare Blur Radius
The amount of blur of the glare effect.
Glare Streaks Blur Radius
The amount of blur of the glare streaks.
Glare Spectrum Intensity
With glare, coloured streaks are often seen, even with white light. This setting controls how much colour shift there is. If it is set to zero then white light would result in white streaks with no tinting.
Glare Spectrum Shift
With this setting you can change the colours resulting from colour shift. It has no effect if 'Glare Spectrum Intensity' is zero.
Vignette settings
These settings produce a vignette effect around the rendered image.
Vignette
Check this switch to turn on the vignette post effect
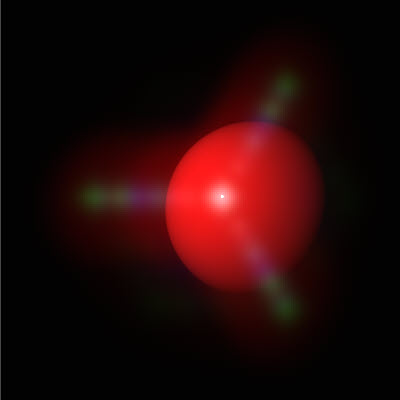
Vignette X Offset, Vignette Y Offset
These two settings control the size of the vignette. There are two because the vignette itself is an ellipse, which it must be to produce a suitable vignette for renders that are not perfectly square.
These images show the effect of different offset values:
Note that negative values are also possible.
Vignette Intensity
The opacity of the vignette. 0% will result in no visible vignette (completely transparent) while 100% will cause a pure black vignette (100% opaque).
Vignette Blur Radius
The radius of the blur along the edge of the vignette. The minimum value is 2%, which gives a hard-edged vignette, while 100% gives a very soft vignette with no discernible edge.
Vignette Color
The color of the vignette mask.
Filmic Filter settings
The Filmic filter is a colour management system which increases the dynamic range of the render, giving better highlights and improved colour saturation. The rationale behind it is beyond the scope of this manual but you can find an excellent discussion at the Blender Guru website.
Filmic Filter
Check this switch to turn the filter on.
Look
This is a drop-down menu with a number of different contrast levels. Pick the one which is most aesthetically pleasing for your render.
Chromatic Aberration
 This feature enables you to simulate chromatic aberration in your renders, which shows as coloured fringes around an object. For an explanation of chromatic aberration, see https://en.wikipedia.org/wiki/Chromatic_aberration
Direction
With this menu you can chose the direction of the coloured fringes, which can be:
Vertical
Fringes appear above and below the rendered object.
Horizontal
Fringes appear to the left and right of the rendered object.
Combined
A combination of vertical and horizontal offset, the fringes then appear diagonally.
Red/Cyan
The fringes are red and cyan. The numeric value is the degree of aberration (in other words, the size of the fringes).
Green/Magenta
As for 'Red/Cyan', but the fringes are green and magenta.
Blue/Yellow
As for 'Red/Cyan', but the fringes are blue and yelow.