A First Scene with Cycles 4D: basic setup
The best way to learn Cycles 4D is to set up a basic scene and render it. This tutorial will show you how to set up a very simple scene, add materials, and set up a mesh light.
Initial setup
- Create a new scene in Cinema, and in the render settings select Cycles 4D as the render engine.
- Add a primitive Sphere object to it. Move the Sphere to +100 on the Y-axis.
- Add a primitive Plane object and make it large enough to act as a 'floor' for the sphere. 2500 x 2500 scene units will be fine. (Cycles 4D does not support the Cinema 4D infinite Floor object.)
- Add a Light object (go to the main Cycles 4D menu and click 'Light' - this will automatically add the required tag) and move it to coordinates X = 0, Y = +500, Z = -500.
That's the basic scene; as you can see, it is very simple - just a sphere resting on a plane with one light.
Setting the scene for use with Cycles 4D
To render the scene with Cycles 4D, in the render settings set the Renderer to 'Cycles 4D'. Don't change any of the settings in the Cycles 4D settings box.
Note that the light object must have a cyLight tag. If you created the light from the Cycles 4D menu, this will have been added for you. If you need to add one separately, just right-click the light in the Object Manager and from the context menu go to Cycles 4D Tags -> cyLight.
The tag is needed because in Cycles 4D all light parameters are set with the cyLight tag. Apart from very basic settings such as intensity and colour, the settings in the Cinema4D light object have no effect. This includes such things as shadow settings, light falloff, noise, etc.
By default the light will be a point light (like Cinema's omni light but it can have a radius setting, which is set to a small point by default) with shadows enabled, which will always be area shadows.
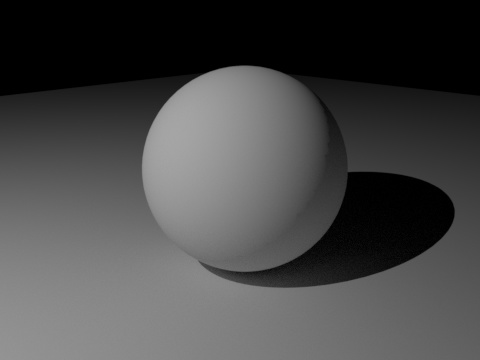
Render the scene
Either render the scene to the picture viewer or turn on the real-time render preview. You should see something like this:

A quick look will show some issues. Firstly, it's rather dark. Cycles 4D uses physically accurate lights with an inverse square falloff, so we need to increase the light strength. In the cyLight tag, increase the Intensity Strength Multiplier to 5000.
Next, the render is a bit noisy. We can fix this by increasing the render samples. If rendering to the picture viewer, then in the render settings for Cycles 4D, under 'Integrator and Sampling' change the 'Samples' value to 12 (the default is 4). If you are using the real-time preview window you can make the same change there. Re-render and you will see a much less noisy result, but it is slower to render.
The final issue is more obvious. The line between the light and dark areas of the sphere (this is the 'terminator' line) is jagged. This is a feature of all unbiased render engines and other such engines have the same problem. To fix this, we can increase the polygon subdivision. In the sphere object, increase the segments to 72 and re-render. Now you should see this:
Which is much better. The scene is still very plain, of course; it needs materials. That is covered in the next page of this tutorial.