Texture: Point Density
The Point Density node is a little different from most other nodes because instead of rendering an object directly, it is used to render a point cloud in an object volume. You can then use this to render smoke- or plasma-like effects.
To use this node, you need to provide two things: a domain object (note that this does NOT mean an xpDomain, which is no longer used in X-Particles), which is the object which contains a volume to render, and a source object which provides the points or particles for the point cloud. In Cycles 4D, the source object can be a polygon object, or an X-Particles emitter.
The material added to the domain object is then rendered using a volumetric shader such as Volume Scatter or the Emission shader.
Unlike other nodes, the name of this node will change automatically depending on the colour source selected from the Color drop-down menu.
Example Output
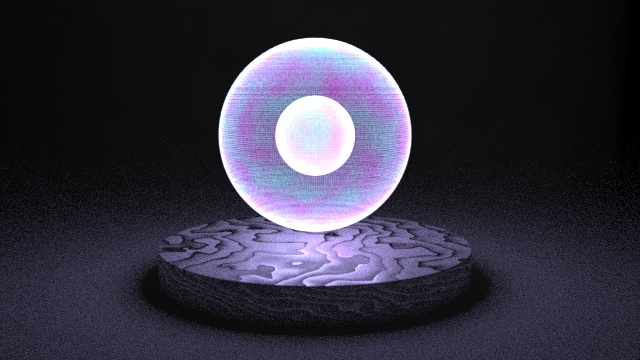
(Many thanks to Mario Tran Phuc for providing this scene. For how to do this, see the How To: Use the Point Density Node:1 page.)
Overview
| Function | Renders vertices or particles volumetrically |
| Nearest C4D equivalent | None |
Settings
Note: a * symbol next to the name indicates the parameter also has an input port. A # symbol indicates that the parameter can only be changed with an input node, not in the node itself.
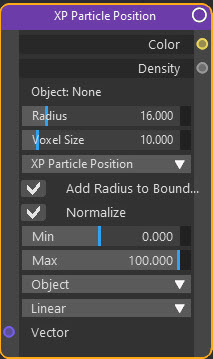
Object
The source object from which the points/particles are to be obtained should be dragged into this field. The object can be a mesh object or an X-Particles emitter.
Radius
This setting controls the radius of the volumetric rendered area. The larger this is, the larger the 'halo' area around each vertex/particle.
As the radius decreases, the result becomes a small, very detailed volume. For large radius values, the overall result is a smoother appearance more like a solid sphere.
Voxel Size
The size of the voxels to use. Reducing this will give a smaller halo and greater details. If the Radius setting is very small, you may need to increase the voxel size significantly to render the points in the volume.
 Note that you should be careful with this setting. If the value is too small the render may fail (especially with values approaching zero). But setting it too high uses a substantial amount of memory and it may result in out-of-memory errors if rendering on a GPU. Unfortunately it isn't possible to define what is too low or too high, as it depends on other scene settings.
Color drop-down menu
This is a list of parameters from which you choose to output a density and colour. In the node editor these are divided into several sub-menus but there is one long list in the attribute pane.
There are two groups of parameters:
- those obtained directly from a particle from an X-Particles emitter
- those obtained from an X-Particles ExplosiaFX object
This menu has no effect if the selected option is not available in the source object. This means that it has no effect at all for mesh objects or splines since there are no options in the menu relevant to those objects.
Add Radius to Bounding Box
If this switch is checked, the bounding box of the volume object is extended by the Radius value. This prevents the bounding box from sharply cutting off the rendered point.
Normalize
This switch and the Min/Max values are only used when ExplosiaFX is the source object.
If this is checked, the node will normalize its output to between 0 and 1. To do this correctly, you must set the Min and Max values to the values you expect to see. So for example, if you choose 'EFX Temperature' and you are using ExplosiaFX as the source object, the node would take the actual temperature from the ExplosiaFX and convert it to a value between 0 and 1 using the Min and Max values to do so.
Min, Max
These are the minimum and maximum values to use for normalizing a value if the Normalize switch is checked.
Space
Vertex or particle positions can be either in object space - that is, are in relation to the parent object (Cinema 4D calls these 'Local' coordinates) or the absolute position in the 3D world. You can select which system to use (Object or World) from this menu.
Interpolation
This menu controls how space between the voxels is handled. The default is Linear, which is suitable for most purposes. Cubic gives smoother interpolation but is slower, while Closest means no interpolation and the rendered are will be blocky and pixellated.
Vector #
Use this node to control the coordinate system to use when sampling the texture. A Texture Coordinate node could be linked to this node to do this.
Output
Color
The output of this port depends on the source selected from 'Color' drop-down menu.
If the X-Particles Color is selected, the port outputs the colour of the particle. If a vector value such as the particle position or velocity is selected, the output is that vector value.
For any of the other X-Particles emitter settings, such as particle radius, the output is a colour derived from the actual value. So for example, if the particle radius is 10 units the output contains the value 10 in each of the red, green and blue components of a colour. To use this value, do not use the colour directly but use a Separate RGB node to extract the value from any component. You can then manipulate this value as required and use it as an input to other nodes, e.g. a Color Ramp node.
If an Explosia FX object is the source, the Color output will contain the fire. fuel, and temperature values in the RGB components of the colour. Again, you can extract these values with a Separate RGB node.
Density
For the X-Particles emitter this port contains a weighted value calculated from the distance between the particle and the centre of a voxel. This could possibly be used an alpha input to other nodes.