Real-Time Preview
Cycles 4D includes a real-time preview window so that, as you make changes to the scene, a preview image is automatically rendered. This makes changing lighting, materials, camera position etc. very easy to do since you can very quickly see the effect rather than having to render the scene.
Please be aware that at present there is a limit on the size of the output that can be rendered in the preview window. The preview will maintain the same image proportions as the full size render, but may be smaller if a large resolution is used. You can turn this off by unchecking 'Limit Render Size' in the window's 'Render' menu.
The reason for this is that otherwise you could select a very large output in the main render settings, try to preview it using the GPU, and get a crash with an out-of-memory error. Future versions of Cycles 4D may see this limit removed.
Using the Real-Time Preview
The preview is shown in a separate window. To open the window, got to the Cycles 4D menu then click 'Real-Time Preview'. This will open the preview window and will render the current scene, giving something like this:
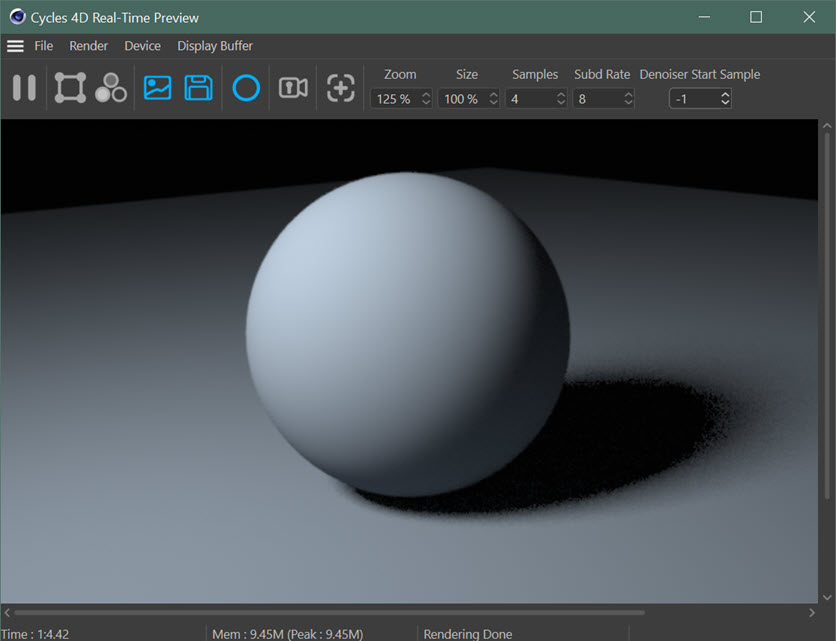
The size of the window is governed by the main Cinema 4D render settings; the size of the preview is the same as the Width and Height settings in the Output section of the main render settings.
The render settings for the preview are the same as the Cycles 4D settings used for a full render.
Window controls
The following controls are available in the preview window:

This is a Pause button. Clicking this will prevent further automatic updating and the button will change to  . Clicking it again will resume automatic updating and the button will change back to the 'pause' appearance.

Clicking this button allows you to draw a box directly in the RTP window.
The box is a render region (not the same as Cinema's render region) and when active only the area enclosed by this box will be rendered in the preview. When the render region is active, the button will look like this:  To remove the box and render the whole window, click this button again.
One point to be aware of is that when the render region is active, the previous render (if any) in the RTP window outside the render region will be preserved when the render region is updated. This lets you quickly compare the effect of changing a parameter somewhere in Cycles 4D to the previous result, for example.
Note that the preview must not be paused or clicking this button will have no effect.

This button is a toggle switch. Clicking it once will show the red component only of the image, and the button will look like this:  . Successive clicks will show the green, blue and alpha components before returning to the
full RGB image.
. Successive clicks will show the green, blue and alpha components before returning to the
full RGB image.

Clicking this
button will open the Picture Viewer window and send the preview image to it. Note that it does not render the scene to the Picture Viewer, it simply captures the current preview image and opens the Picture Viewer to display it.

Clicking this button saves the image in the RTP window to disk.

This is the same as checking the Clay Material switch in the render settings. All objects in the scene will be rendered with a basic, light-grey diffuse material (a 'clay' material). However, this button only affects the real-time preview render. It has no effect on the final render to the picture viewer. Click the button again to restore the scene materials. When the clay material is being used, the button looks like this: 
 If you select this option, all materials in the scene are temporarily replaced by the clay material. If your scene is lit only by objects with an Emission shader, since those materials are replaced by the clay, the scene will go black because it no longer has any light. Just be aware of this if you do use this option.

Clicking this button will lock the currently selected camera. If you then change cameras in the object manager, the camera used for the real-time preview will not change.
When a camera is locked, this icon will change to look like this: 
If you click it again, then if no other camera is selected the camera will be unlocked. If a different camera is selected, that one will be locked instead.

Clicking this button will
show the settings of the currently active camera in the attribute manager. You can then use the controls in the camera's object tab to select a focus object.
Zoom
This is a simple zoom setting enabling you to zoom in and out of the preview image. You can also use the mouse scroll wheel in the image window to zoom, just as in the Picture Viewier.
Size
Unlike the Zoom control, this changes the render resolution in the preview window. For example, suppose the render settings have an output size of (say) 1920 x 1200. This is a large size to render in the preview window, so you can reduce the size of the preview render by using this control. The value is a percentage of the output size, so if set to 50% the preview render will be half the width and height of the final render.
See also the 'Fit' command below.
Samples
This is the number of samples used for the preview render. This value is only used in the preview, so you can have a different value in the preview from the final output. This can be very useful to speed up the preview render if you have a high number of samples in the render settings.
Subd Rate
This is the subdivision rate used for micropolygon displacement. Its use is explained in the page How To: Use Displacement.
Denoiser Start Sample
 This setting determines how many sample passes are denoised when the preview is rendered. An example may make this clearer.
First, enable denoising in the preview window by checking 'Denoiser' in the Render menu. Also set 'Samples' to 2. When the scene renders, you will see four sample passes (this is the number of samples squared).
If 'Denoiser Start Sample' is set to -1, which is the default, only the final sample pass - the fourth in this case - will be denoised. If you set this value to 3, the denoising starts at the third pass, so you have two denoising passes - for the third and fourth samples. If you set this value to 1, all four passes will be denoised.
As a general rule, leave this value at -1 so you only see one denoising pass no matter how many samples you have. This is desirable because the denoising pass will slow down the preview render significantly. If you need more denoising, set this value to somewhere between one and the number of samples squared minus one. Note that setting this to a low value if you have a lot of samples will really slow down the previer render.
File menu
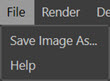
Save Image As...
This item enables you to save the image in the preview window to disk. You can choose from a variety of different formats.
Help
Clicking this item opens this manual.
Render menu
The first four entries in this menu correspond to a type of object to render in the preview - hair, motion blur, particles, and spline. Check or uncheck these entries to render (or not) the respective objects:
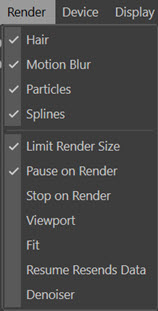
Limit Render Size
By default, Cycles 4D limits the size of the output that can be rendered in the preview window. The preview will maintain the same image proportions as the full size render, but may be smaller if a large resolution is used. You can turn the limit off by unchecking this menu entry.
Pause on Render
If this switch is checked and if the preview window is in the middle of updating a render, and you render the scene to the picture viewer, the real-time preview render will be paused until the main render is complete. This is to avoid the possible situation of two renders occurring simultaneously.
Stop on Render
Unlike 'Pause on Render' if this option is checked rendering the scene to the picture will stop any ongoing rendering to the real-time window and it will not resume when the main is complete.
Note that you can only select 'Pause on Render' or 'Stop on Render' - you cannot have both enabled at the same time.
Viewport
When checked, the rendered result from the real-time preview will also be shown in the viewport (note: the scene is not actually rendered to the viewport; instead, the rendered preview image is copied to the viewport). The real-time preview window must be open to show the preview render in the viewport, if the window is closed this feature will halt.
Fit
If you select this item, then whenever the real-time preview window is resized the render will be resized to fit the window. (This does not alter the render size in the main render settings.) Depending on the size of the preview window compared to the actual render proportions, non-rendering borders may be shown in the preview window. You can adjust the opacity of these borders in the main Cycles 4D preferences.
Resume Resends Data
If the render is paused and then resumed, the necessary data is sent to the render device again if anything has changed in the scene. but not if the scene hasn't changed. Very occasionally a situation can arise in which the data is not resent but should have been. If you encounter an error in the preview render which requires the RT preview render to restart from the beginning, turn this option on. This will force all render data to be resent and the render restarted.
Denoiser
Check this entry to enable the denoiser to run in the preview. Note that you do not have to enable denoising in the render setting to denoise the preview. See also 'Denoiser Start Sample' above.
Device menu

This menu contains a list of the devices available for rendering in the preview window. From here you can select which device Cycles 4D will use for rendering. The options depend on the devices you have installed but will always contain the CPU and CUDA.
If you select CUDA as the render device, the menu is extended to include all the CUDA devices found on the system:
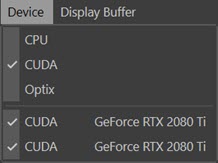
Then you can select which device to use for the preview window render. Note that this does not have to be the same device selected in the main Cycles 4D render settings, so you can render on different devices in the picture viewer and the real-time preview.
By default all CUDA devices are selected but you can turn one or more off to use only specific devices in the preview. If you uncheck all of them, the preview window will default to the CPU.
Note that the option in the main render settings to use the GPU plus the CPU is not available for the real-time preview.
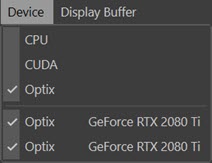
You can also select OptiX from this menu, if you have a graphics card and driver which supports it. Then you will see this:
Display Buffer menu
Normally the preview window will render the final or 'beauty' result. But such a result will be made up of a variety of different components, e.g. diffuse colour, transmission colour, shadows, ambient occlusion, etc. The menu looks like this:

The easiest way to test these is to create a material with a Principled BSDF shader then change the various parameters and check the effect on the display buffers.
With this menu you can display one of these components in the preview window instead. This can give you a good idea of what effect (for example) ambient occlusion is having on the scene. The choices are:
| Buffer | Result |
|---|---|
| Beauty | The final rendered result |
| Normal | Surface normals |
| UV | Mapped UV coordinates |
| Mist | Although named Mist, this is really a depth pass |
| Emission | Light from objects with an Emission shader |
| Environment | Light from the Cycles 4D Environment |
| AO | Ambient occlusion (the objects must have materials with ambient occlusion included) |
| Shadow | Shadows |
| Diffuse Direct | Direct lighting in the scene using the colour without specular, transmission, etc. |
| Diffuse Indirect | Indirect lighting in the scene, e.g. from light reflecting from another object |
| Diffuse Color | Colour only, no effect from lighting |
| Glossy Direct/Indirect/Color | As for Diffuse but for glossiness; increase Specular or Metallic parameters in a Principled BSDF to see this |
| Transmission Direct/Indirect/Color | As for Diffuse but for transmission; increase the Transmission parameter in a Principled BSDF to see this |
| Volume Direct | Direct lighting on a volume (requires a volume shader, e.g. Principled Volume) |
| Volume Indirect | Indirect lighting on a volume (requires a volume shader, e.g. Principled Volume) |