How To: Use Displacement
This page shows you how to use displacement on an object in Cycles 4D.
Displacement is handled through materials in Cycles 4D and there are two nodes to choose from, the Displacement or Vector Displacement nodes.
Set up the object material
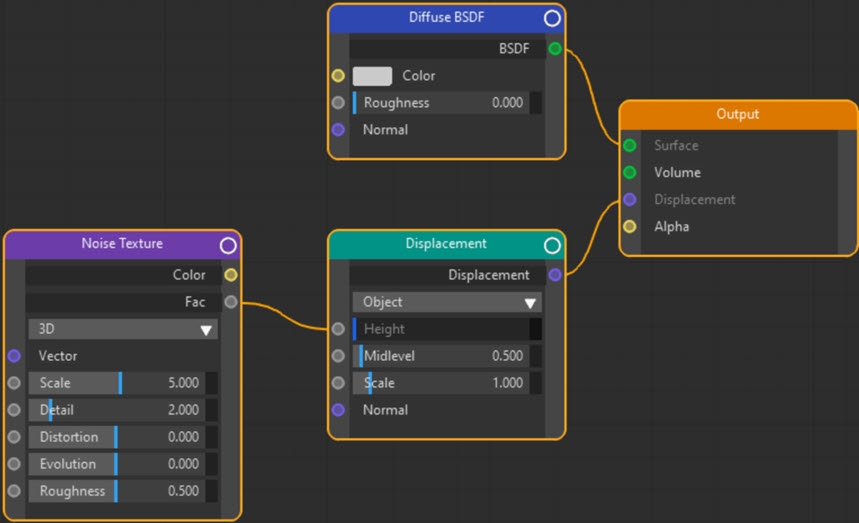
To get displacement you need to input a value into the output node's Displacement setting. A Noise texture node works fine as shown here:
Displacement Method
This setting is a material-wide setting and therefore is found in the Material Settings tab in the right-hand pane of the node editor:

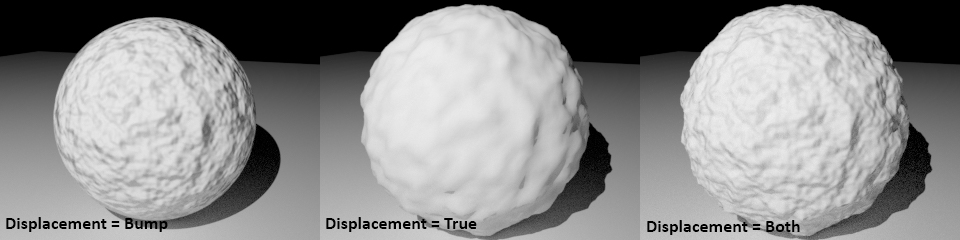
Change the Displacement Method drop-down menu to the desired option:
Bump
No displacement, use bump mapping only. This is the default setting, so to see true displacement you must change this setting.
True
Use true polygon displacement.
Both
Use both true displacement and bump mapping.
These images show the difference between these settings, using the node tree shown above:
Micropolygon Displacement
So far, this is a conventional displacement system. But Cycles also has micropolygon displacement, which has a number of advantages. It offers:
- faster rendering
- much less memory use
- greater detail
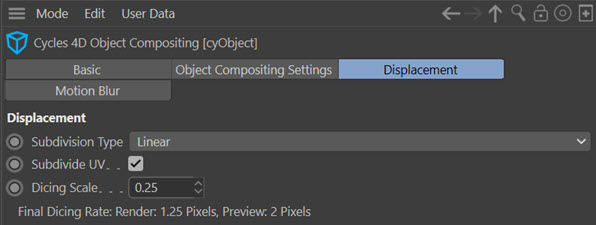
This is set up on a per-object rather than per-material basis. To use it, attach a cyObject tag to the object and in the Displacement tab, set Subdivision Type to Linear or Catmull-Clark. The Cycles engine implements adaptive subdivision (i.e. more subdivisions in polygons nearest the camera), which in Blender you have to turn on manually but in Cycles 4D setting Subdivision Type to anything other than None turns it on automatically.
Subdivision Rate
The amount of subdivision is set in two places as the 'subdivision rate'. For the final render, you can find this in the render settings, in the Subdivision section. This is expressed in pixels and by default is set to 5, which means that 1 micropolygon corresponds to 5 pixels in the rendered result. This can be set to a different level in the real-time preview window, where by default it is set to 8.
You can see that the smaller the subdivision rate, the more detailed the surface will be. Don't make the mistake of increasing the rate thinking that this will increase the subdivision!
Dicing Scale
There is an additional way to change the subdivision on a per-object basis. In the cyObject tag, there is a setting named 'Dicing Scale'. This value is used to multiply the subdivision rate (in both the final render and the real-time preview render) for that object only. So for example, if the subdivision rate in the real-time preview is 8, but for a particular object you would like this to be 2, set the Dicing Scale to 0.25 (8 x 02.5 = 2). The tag will tell you the actual subdivision for this object in the 'Final Dicing Rate' line:
If you are animating a scene and find that the displacement flickers, try reducing the dicing scale so that the final dicing rate on render is 1 pixel. For example, the subdivision rate in the render settings is 5 pixels by default, so you would alter the dicing scale in the cyObject tag to 0.2 (as 5 x 02. = 1).
With very high subdivisions, pixels close to the camera might have to be subdivided so many times it would cause a huge increase in memory use and render time. Therefore you can put a limit on the number of subdivisions: this is found in the render settings, Subdivision section, as the Max Subdivisions setting.