X-Particles and Cycles 4D: Rendering Trails
The Trail object in X-Particles produces a procedural spline. Cycles 4D can render splines without the need for geometry, so this page is also applicable to spline rendering in general.
If you are having any problems rendering X-Particles trails, please see the section Limitations on rendering trails at the bottom of this page.
Rendering a trail
To render a trail is very simple. Simply add a Cycles 4D object material to the trail object. The trail will then render. You might see something like this:
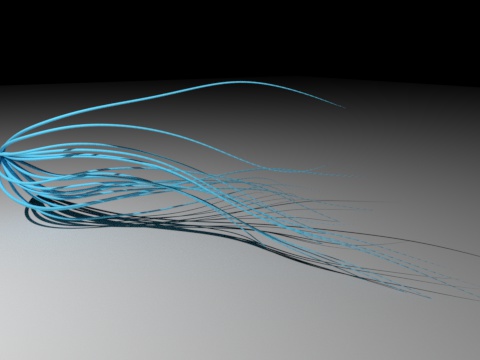
Note that in this scene the trail thickness tapers to zero. To do this, also add a cyCurve tag to the trail object. The Curve Tip Thickness setting in the tag controls the thickness of the rendered spline.
In the cyCurve tag, there is a 'Subdivide' switch. For X-Particles trails, you should turn this off (and you MUST turn it off if you want to use the trail colour data - see below). However, then if you look carefully you can see that, depending on the viewing distance and the lighting, the trail can give an odd, segmented appearance:
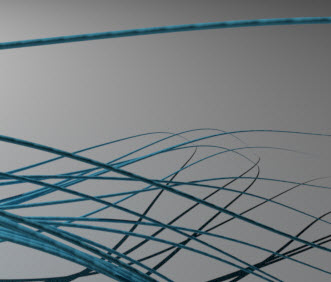
To fix this go to the Cycles 4D render settings, where the Curve Type is set to Curve Segments by default. You can fix this either by changing the type to Line Segments, or by increasing the subdivisions - 4 should be fine in most cases.
Important note
If you turn on motion blur in the Cycles 4D render settings, the trails will no longer render. This is because in the Cycles engine, motion blur on an object which changes its number of vertices during the animation may crash. Since trails will almost always have a changing number of vertices, they will not render if motion blur is on, to avoid this problem.
If you need both trails and motion blur in a scene the solution is very simple: add a cyObject tag to the Trail object and ensure that the motion blur switch in the tag is off. The switch overrides the motion blur switch in the render settings, so for the Trail object motion blur will now be disabled and they will render as normal.
Adding materials
As with any other object you can add any materials to the trail. Remember that the trail is just a spline, so any material will work.
Driving materials with the Hair Info node
The Hair Info node is slightly misnamed. It could be called the Spline Info node, because that is effectively what it returns - information about the actual spline.
As an example, suppose we want the tip of each trail to be a different colour to the rest of the spline, something like this:
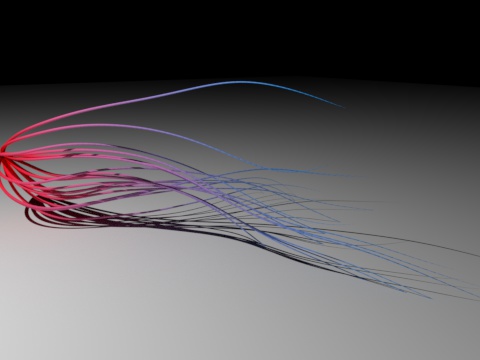
You can do this very easily with the Hair Info node. The node tree is very simple:

Driving materials with particle data
This has to be done differently than adding materials to particles, where the Particle Info node can be used to retrieve particle data such as colour. This cannot be done with the trail object because there is no direct access to the particle data, only the trail data.
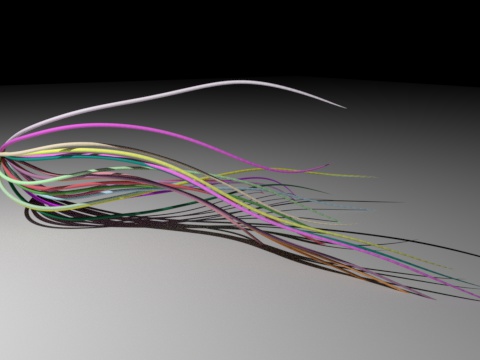
In the latest version of X-Particles the trail data contains trail colour for each vertex. This data can then be accessed using an Attribute node.
If the emitter is set to emit particles with random colours, this is the result:
To set this up is extremely simple:
- in the Cycles 4D material add an Attribute node and link its Color output port to the input Color port of another node (this example uses a Diffuse BSDF node)
- in the Attribute node, select the 'Trail' preset
- very importantly, in the cyCurve tag on the trail, turn the 'Subdivide' switch OFF. Cycles 4D cannot subdivide the trail colour/thickness data, so if this option is on, the trails will render black
Then Cycles 4D will take the trail thickness and colour from the trail data.
Trail thickness
The thickness of a trail is controlled by three things:
- whether the thickness is set in the xpTrail object or not
- whether 'Set Thickness' in the cyCurve tag is checked
- and finally by the 'Curve' spline control in the cyCurve tag
Full details of how to change the thickness of X-Particles trails can be found in the cyCurve tag page.
Limitations on rendering trails
There are some limitations to be aware of when rendering X-Particles trails with Cycles 4D. These are explained elsewhere but in summary they are as follows.
1. Subdivision
Due to a limit within the Cycles render engine, any spline with more than 32K points in one segment will not render at all. This is a protective measure to avoid a crash. It's quite easy to demonstrate this: in the xpTrail object, set 'Intermediate Points' to 'Uniform' and the number to 8. Then turn on the Subdivide switch in the cyCurve tag. You should see the trails disappear in the real-time preview, and they will not render to the picture viewer.
If you are rendering trails with the particle colour, do not subdivide the trail, either in the xpTrail object or in the cyCurve tag. The trails will render black if you do since although the trail spline can be subdivided, the trail colour data can not.
As a general rule, do not subdivide the trails in the xpTrail object or the cyCurve tag, to avoid these issues.
 Note that you can safely alter the Curve Subdivisions setting in the main render settings; this will not cause the trails to render black or disappear.
2. Setting the trail thickness
If you set the thickness mode in the xpTrail object, you should note that this will be overriden by the Set Thickness switch in the cyCurve tag, and that this switch is enabled by default. If you wonder why your trails are ignoring the thickness setting in the xpTrail object, you need to turn off the Set Thickness switch in the cyCurve tag.