Editing Node Settings
When developing Cycles 4D materials, you will need to edit the nodes you add to the node tree. This page is a quick guide to doing this.
Editing a node
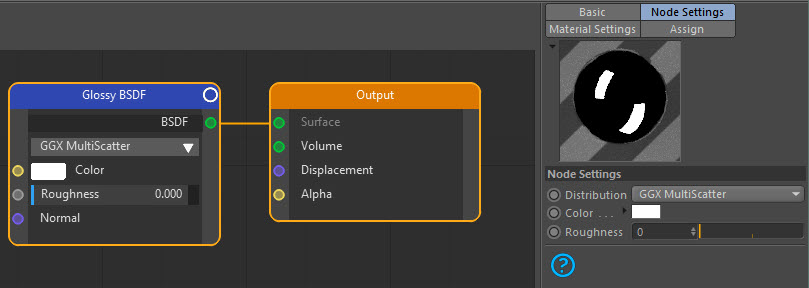
Take a look at a simple node, the Glossy BSDF node, in the node editor:

The first thing to note is that you can edit the node settings in any of three places:
- on the node itself
- by checking 'Show Attributes' in the 'Options' menu and editing values in the pane which opens in the node editor window, as shown above
- or by selecting the node and editing the values in the Cinema 4D attributes manager
You can use any method, whichever you find most convenient.
You cannot edit the output ports of course, but note that not all input ports can be edited either. For some, the only way to change them is to link another node to the port. In the Glossy BSDF node, the Roughness and Color ports can be edited, but the Normal port cannot - you must link another node to it if you need to change it.
Also remember that, once you connect a node to a port, you can no longer edit the value. In the right-hand pane (or the attribute manager) that option is no longer present in the attributes pane, and in the node it is grayed-out to show that you cannot edit it:

Changing the node name
You might want to change the name of the node to something more meaningful. To do this, right-click the node and choose 'Rename Node' from the context menu. You can also do this by selecting the node and pressing the Return/Enter key.
Note that this is not possible with an Image Texture node if you add a bitmap or shader to it - the node name is then always that of the shader of bitmap.
Interface elements
Drop-down menus
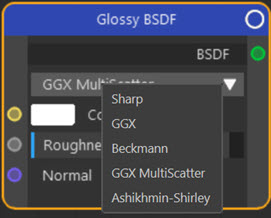
On the node itself, there is what looks like a drop-down menu directly under the BSDF output port. This is the Distribution control, and you can set it in the usual way in the right-hand pane. In the node itself though, if you click it you will get what is more of a pop-up menu:

It works like any other such menu, just the appearance is slightly different.
Colours
Many nodes have a colour field, as in this one. To change the colour, simply click the colour swatch. The usual Cinema 4D colour picker will appear.
Editable values
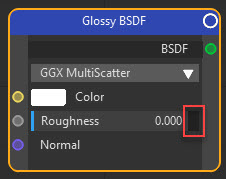
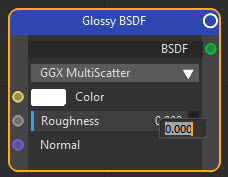
Many fields have numeric or vector values you can change. You can do this either in the Node Settings tab, using the standard Cinema 4D interface, or directly in the node. To edit a field, double-click the small black box to the right of the value (shown in the first image below with a red line around it) and enter the new value in the entry field which appears:


Note: do not click or double-click the numeric value itself or the slider. This will simply move the slider; to edit the vale, you must double-click the small black box.
Editable values also have sliders and you can also change the value in the node by dragging the slider bar to the left of the value (the bar position is shown by the orange line).
You can also edit certain text fields (e.g. the Name field in the Attribute tag) by double-clicking and editing the text in that field.
 Many nodes have a mysterious-sounding input value named 'Fac'. This stands for 'Factor' and is a numeric value usually used to control an aspect of the node - such as the position along the colour gradient in a Color Ramp node, for example. Don't be put off by this, it is just a shorthand in Cycles for a numeric input used in a certain way.
Values which are not editable in the node
Occasionally a value cannot be edited directly in the node. The Image Texture node is a good example. To add a bitmap to this node, you must use the standard Cinema 4D texture link field in the Node Settings tab.
Check boxes
Some nodes have check boxes, which you can check or uncheck in the node or in the Node Settings tab.
Node groups
The final thing you can do with nodes is to combine them in a group. This is explained on the Node Groups page.
Node frames
These are a convenient way to reduce the screen real estate occupied by a complex node tree or part of a tree. See the Node Editor page for more details.