Cycles 4D Materials
Cycles 4D uses a node-based material system. This is very powerful and flexible - far more so than the material system in Cinema 4D itself.
You should note that in a Cycles 4D scene you cannot use Cinema 4D materials. They must all be Cycles 4D materials. But in one or two places you can use some of the Cinema 4D shaders, such as Brick, Checkerboard, etc. Most or all of the surface shaders will work but as you might expect, those which generate effects which use Cinema's inbuilt renderer will not.
Creating Materials
Material Manager
Cycles 4D materials are created in the Cinema 4D material manager and have their own menu entry:
From here, you can create the three basic types of Cycles 4D material - Background, Light, and Object. Selecting one of these will give you a basic node tree for that type of material.
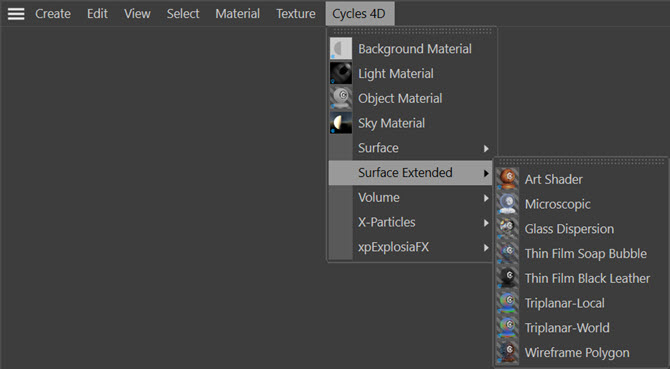
However, there are a large number of preset materials in three sub-menus. These are;
- Surface (for materials to be applied to an object)
- Surface Extended - a group of more complex surface materials
- Volume (for volume rendering, including materials for use with the X-Particles domain object and with Turbulence 4D)
- X-Particles (fmaterials or use specifically with X-Particles).
 Note: a limitation of Cinema 4D means that these sub-menus will not appear in R14 or R15. R16 onwards is needed to display them.
Convert Materials
It is possible to convert simple Cinema 4D materials into an approximation in Cycles 4D. In many cases you will need to tweak settings in the nodes and possibly add other nodes, but the converter will give you a good start.
To use the converter, select a Cinema 4D material in the material manager, then go to the main Cycles 4D menu and click 'Convert Materials'. This will create a new Cycles 4D object material with a node tree already set up.
Note that this can only be used on ordinary Cinema 4D materials. Others, such as the Hair material, Nukei, etc. will not be converted.
Converted channels
The converter will handle the following channels:
- Color
- Diffuse
- Luminance
- Bump
- Transparent
- Reflectance - the converter looks for the first layer in the reflectance channel which is of type GGX or Beckman amd uses that to add glossy reflection as a GGX Multiscatter node
Non-converted channels
The following channels are ignored:
- Displacement
- Fog
- Glow
- Normal
- Environment
Bitmaps
In all cases, bitmaps are handled through an Image Texture node. If the image has an alpha channel, that is connected using the Alpha output port of the node.
Modifier keys
The converter supports certain modifier keys to determine what happens to the Cinema 4D materials in the scene. These are:
| Modifier key | Effect |
| None | All Cinema 4D materials in the scene are converted to Cycles 4D materials and the existing Cinema 4D materials are deleted after conversion |
| Shift | All Cinema 4D materials in the scene are converted to Cycles 4D materials but the existing Cinema 4D materials are not deleted |
| Ctrl | Only selected Cinema 4D materials in the scene are converted to Cycles 4D materials, and those materials are deleted after conversion |
| Shift + Ctrl | Only selected Cinema 4D materials in the scene are converted to Cycles 4D materials, but those materials are not deleted |
Material Types
Cycles 4D has three basic types of materials:
Object material: used on scene objects and can also be used on particles generated by the X-Particles particle engine.
Background material: specifically intended for use on the cyEnvironment object.
Light material: used only on lights in the scene (not mesh lights, only actual light objects).
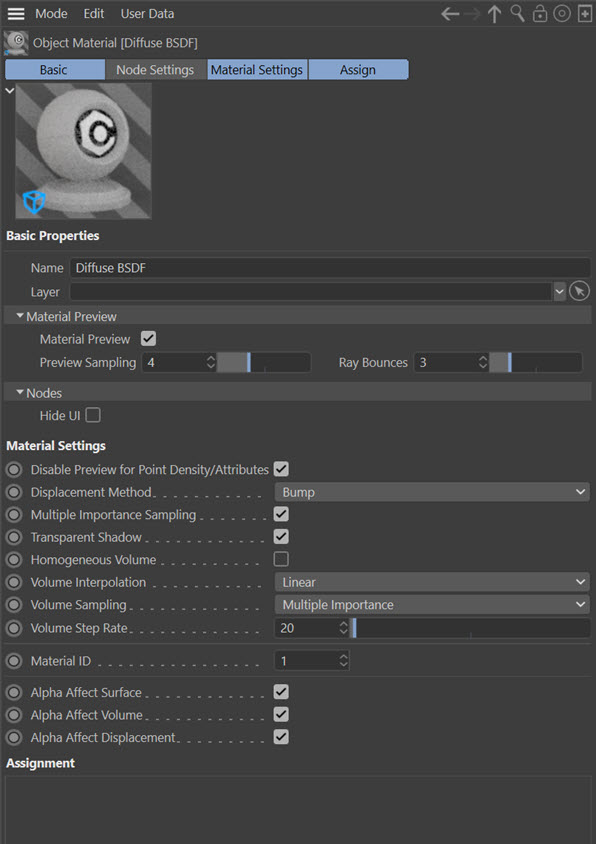
Basic, Material Settings, and Assign Tabs
All materials are constructed from nodes, but they all have certain settings which are applicable to the overall material rather than to any node in the material. Since these settings are common to all materials, they are described here.
Name
The name of the material.
Layer
The layer it is in, when using Cinema 4D's layer system.
Material Preview
If you find that the material preview takes a long time to update, you can disable the preview altogether by checking this switch.
Important: rendering the material preview takes time. If the material preview were to update while the real-time preview was active, it could slow down the real-time preview noticeably. For this reason, the material preview is not updated if changes are made to the material as long as the real-time preview window is active. To see the material preview update, either close the real-time preview window or use the pause button to turn off the real-time preview temporarily.
Preview Sampling
This is the number of samples taken for this material; it is the same as the 'Samples' controls in the main render settings and the real-time preview, but only for the material preview. You can increase this for a higher-quality preview, but it will take longer to generate.
Ray Bounces
This is the same as the 'Max Ray Bounces' control in the main render settings, but only for the material preview. Lowering it can speed up the material preview but if it is too low transparency in refractive materials such as Glass BSDF will not be seen in the preview.
Hide UI
Each node has its own user interface, which are sometimes large and complex. If you want to hide that interface, and just show the ports, check this switch. Note that this will apply to all nodes in the material. You can still edit the node settings in the Node Settings tab of the node editor.
Disable Preview for Point Density/Attributes
If this switch is checked, which it is by default, the material preview image is disabled for materials using the Point Density or Attribute nodes. The reason is that the material updates can become extremely slow when using these nodes and an X-Particles xpEmitter object since the nodes have to repeatedly fetch data from the emitter. The same is true when using the Point Density node if the source object has a large number of vertices.
Displacement Method
This is part of the polygon mesh displacement system in Cycles 4D. To see how to use it, please see the displacement example page.
Multiple Importance Sampling
Most of the time you can leave this checked. It is only used if the material contains an Emission node. If it is unchecked, direct light emitted from objects with the material will not be sampled, and only indirect lighting will be used. In some cases, such as weak light sources, turning this off may result in less noise in the image.
Caution: Multiple Importance Sampling is memory-hungry. If you are rendering particles and the material attached to the particle has an Emission shader, you should turn MIS off. Otherwise you may see out-of-memory messages when rendering on the GPU. The same also applies, but to a lesser extent, if you render many instances of a mesh object, for example objects generated by Mograph or by an X-Particles Generator or Sprite object, and these objects have a material with an Emission node.
Transparent Shadow
This switch is only applicable if the material contains a transparent BSDF node. Normally, shadows created by an object with this material are themselves partially transparent (this is physically correct). However, transparent shadows take longer to render so unchecking this option will result in the object casting opaque shadows, which is not physically correct but will render faster.
Homogeneous Volume
The difference between heterogeneous and homogeneous volume is explained in the path tracing page. Turning on this switch will force a material to be considered as homogeneous.
Volume Interpolation
The interpolation type for volume rendering. The options are Linear (the default) and Cubic. This can be useful for removing artefacts in smoke rendering, for example.
Please see the important note regarding this parameter on the Known Issues page.
Volume Sampling
This setting is only applicable if the material contains a volume absorption or volume scattering node. The drop-down menu offers three options: Distance, Multiple Importance, and Equiangular.
An example may help to show the difference. In this scene, the material on the sphere has a volume scattering node set to a high density. The scene light is not close to it but some distance away. The three sampling methods give these results:
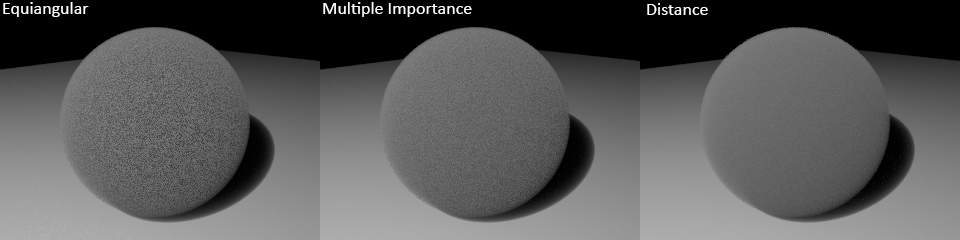
The Equiangular method gives most noise, while Distance gives the least. Multiple Importance is in between these two. However, if the light was very close to, or inside, the object the situation would be reversed: Equiangular would give the least noisy result while Distance would give the most noise.
In this case therefore which option you choose depends on the scene lighting and the proximity of light sources to the object. The default is Multiple Importance which gives a reasonable result in all cases.
Please see the important note regarding this parameter on the Known Issues page.
Volume Step Rate
 This value acts as a multiplier for the volume step rate in the render settings. The higher this value, the faster the render but detail may be lost.
Material ID
You can assign any numeric value to this field, and can then use it to render separate mask layers by turning on 'Material IDs' in the render elements tab of the render settings.
Alpha Affect Surface/Volume/Displacement
These settings are used with the Alpha input port in the Output node. They control whether the alpha which is input to that port will affect the surface, volume, or displacement input ports. You can set the alpha to affect all three, or none, or any combination.
Assignment
This is the list of objects to which this material has been assigned, just as in Cinema 4D's own materials.